
How to: Configure Aruvo TV White Label Contact Settings
🧾Summary
This article talks about the steps a customer needs to follow to complete the setup for the Contact Us Section.
🗂️Table of Contents
🕐 When to Use This Guide
- If you are looking to set up the Contact Instruction so that the guest can reach out for any assistance.
- You need help with the exact steps you need to follow to achieve the setup for the Contact Us Section
- .You’re onboarding a new TV in a unit
✅ Before You Begin
- Ensure that your smart TV(s) and/or streaming device(s) are compatible with Aruvo TV. For a complete list of compatible devices, see Compatible TV Models: Aruvo TV
- Make sure you have an account set up with the Aruvo TV. How To: Create your Aruvo TV account
- You are logged in to the Aruvo TV Portal
✅ Benefits
- Add Personalized instruction for the guest.
- Option to change and edit the Layout type and text
- Option to create a QR code for Email, phone, and website contact.
⚙️ Step-by-Step Setup
Step 1. Open the web portal Aruvo TV
Navigate to Personalized More and Select Contact Us.
Important Note:
Please ignore the first step and start from the second step if you are not setting this up for the first time. (This Step is only applicable if you are doing the setup for the First time during the Onboarding)
Step 2. Navigate to the Contact Us Section.
Please follow the steps below to begin the Setup for the Live TV Section
- Click on the TV option on the Left Side menu tab.
- Then click on Contact Us located at the top menu tab.
- Select the Platform you are using, and then click on Contact Us Screen Settings
Step 3. Contact Us Screen Settings
Once you expand the Contact Us Screen Setting, you have two options: either to select if you want to show this section to the guest or not, or if you want to change the menu title for this section.
Display Contact Us on Smart TV.
Click on the Toggle option to turn the Contact us Section off on the TV for the Guest.
Menu Title.
Click on the Edit icon for the Menu title to add a new one of your own choice
Please tap on save to save the changes.
Step 4. Contact Us Layout and content.In this section, you can change and customize the following:
Layout Type
Layout type is how the contact information will be shown on the TV to the guest. You can decide how you want this information to be displayed on the TV, like you can choose if you want to keep the image at the top or bottom, or the body on the left or right side, etc.
Click on Change Layout Type and then select from the Available options depending on which one suits best on the TV.
Choose from the options available on the Left side and click on Select Layout on the Top Right side.
Image
You can use a default image from Aruvo, or you can add a personalized image, which will be displayed on the TV Screen once the guest clicks on the contact us menu.
You can choose to disable the image for the Contact Us Section or choose a Personalized Image for this Section.
Once you click on the Change Image, it will take you to the next screen where you can click on Upload and add an Image of your choice, and click on Save to save the Changes.
Important note:
For best result upload an image sized 896X 1080, you can also use the Aruvo default images for the best Fit.
Title
You can add a title for the Contact Us section to make it more personalized. Like you can use the tags and can add the guest's name here as well, or the Actual Unit name.
You can click on the Edit icon to change the title.
After clicking on the Edit icon, you can make the following changes:
- Text Font
- Text color
- Text size
- Background color
- Tags
Important note:
Using the Tags will allow Aruvo Software to fetch the information related to the current guest's details, Property details, and other information uploaded on the Aruvo software for each Property.
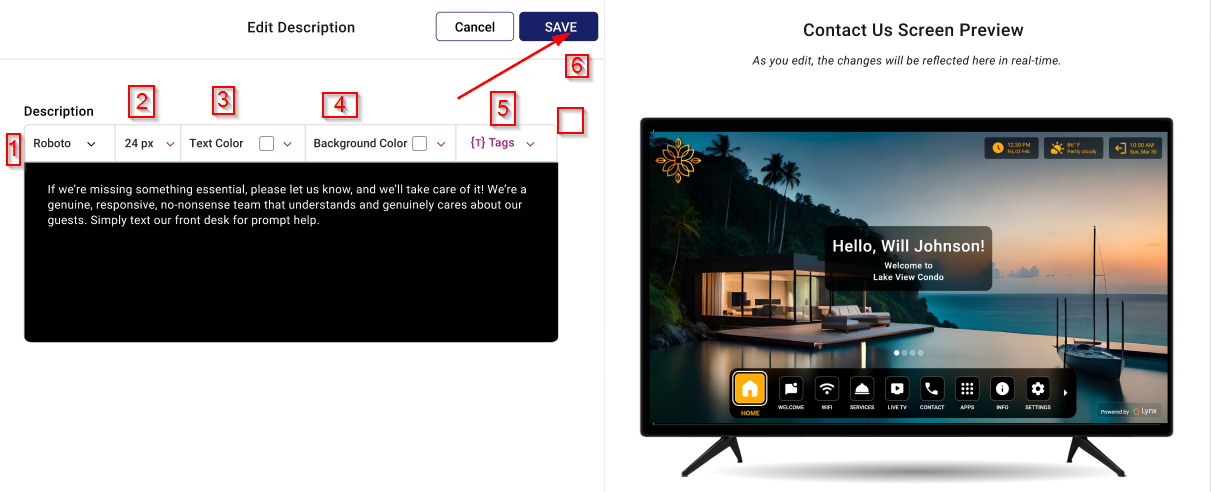
Description
In the Description, you can add the main body of the message for the guest with details of the person or the team they can reach out to if needed.
You can click on the Edit icon to add a detailed and personalized message for the Guest.

After clicking on the Edit icon, you can make the following changes:
- Text Font
- Text color
- Text size
- Background color
- Tags
QR Code
Instead of a guest dialing the phone number, manually putting in the Email address, or manually typing the website link, we can create a QR code for them, and all they need to do is just scan the QR code.
You can create a QR code for the Contact Email, Contact Phone, and Contact Website for the convenience of the Guest, as it will make it easier for them to reach out in case of an Emergency.
Click on Edit for each one to create a QR code for each one.
- Select the QR code Type, whether it is for Email, Phone or Website.
- You can upload a new icon by clicking on the Edit option
- You can change the Icon color and Background color
- Choose a Title and then add the value in the last box, so if you are
- Creating a QR for email, then in the last box for value, you should enter the Email address.
➡️Next Step
Once you have updated the Contact Us Section, the next step is to configure the Live TV: How To: Select Live TV Apps for Aruvo TV
Comments
0 comments
Article is closed for comments.